Configure TDS with Azure AD
This topic provides the steps for configuring TDS to use Azure AD as the STS (Security Token Service) authentication mechanism.
Configuration Steps
Azure Steps
- Go to Azure Portal.
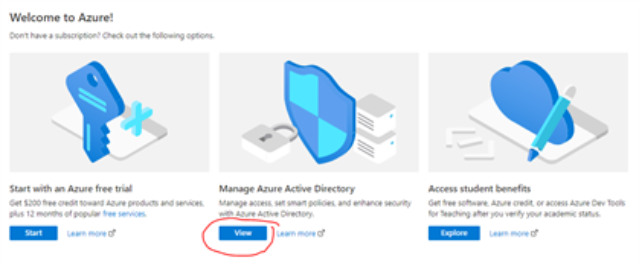
- Click the View button under Manage Azure Active Directory.
- Click App Registrations from the menu panel on the left.
- Click New registration.
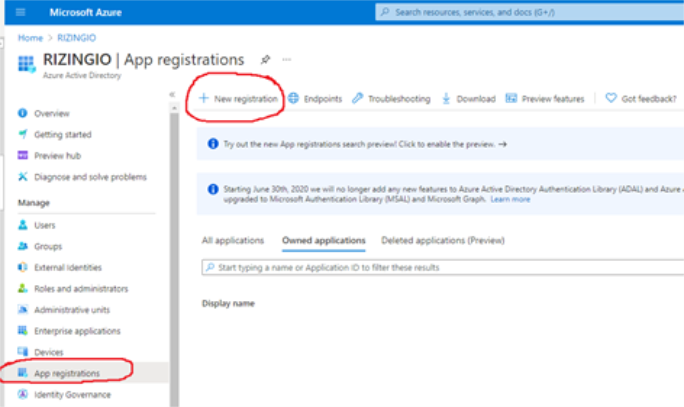
-
Fill in application details:
-
Redirect URI must point to App Manager’s URL
Example: https://test.rizing.com/tds
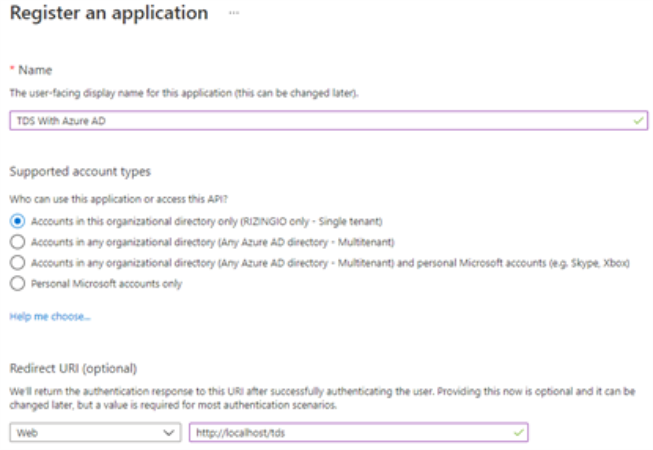
-
Redirect URI must point to App Manager’s URL
- Click Register.
- Go to the API permissions section in the side menu.
- Click Grant admin consent for YOUR_ORG.
- Click Yes.
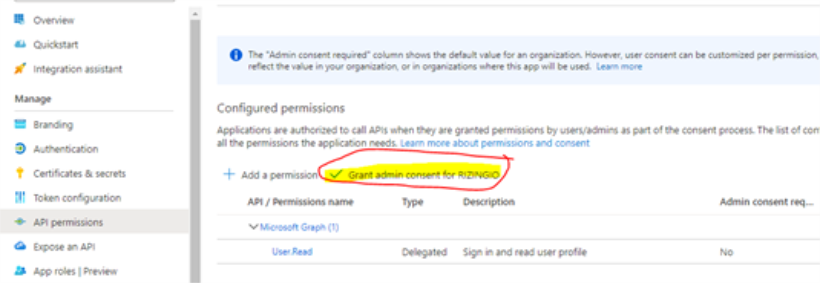
Note: This will give User.Read permissions to your users.
TDS Configuration Steps
This step is to back up the TDS application state so that it can be restored to this point in case the authentication mechanism change does not complete as intended. Skip this step if you are not applying this change to an already configured/established TDS environment.
If you are making these changes to an existing TDS instance:
- Completely backup your existing TDS and TDS configuration store before making any changes.
Note: You could stand up a new instance for this purpose, if that is easier for your scenario.
The followings steps remove the Integrated Windows Authentication configuration from TDS in preparation for the switch to an STS authentication mechanism. You can skip this section if you are not making these changes to an existing TDS instance that already has Windows Authentication setup.
If you are making these changes to an existing TDS instance and it is currently using Windows Authentication:
- Go to App Manager > Administration > Authentication.
- Change the Authentication Mechanism to No Security.
- Click Save and then click Change to confirm your changes.
Note: It may take a few moments for the application to save. Wait for it to complete.
- Disable Windows Authentication from the TDS application within IIS.
- Set Anonymous Authentication to Enabled.
- Set Windows Authentication to Disabled.
- Ensure App Manager loads properly.
Note: At this point there is no security/authentication being applied to TDS.
The following steps will set up a non-externally managed role for global site administrators. This role will be used to place the initial STS authenticated user in, so that after the initial switch to the STS authentication mechanism, the user will be able to continue administering App Manager. If a role like this already exists, skip to step 12 to ensure the role has all the needed privileges.
- Go to App Manager > Administration > Roles.
- Create a non-externally managed role for global site administrators to have full access to TDS – if one does not exist already
- Do not check the Is role externally managed checkbox for the role.
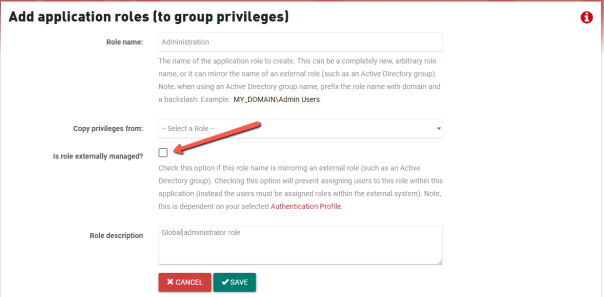
- Click Save.
- Go to App Manager > Administration > Role Privileges.
- Select the Administrator, or equivalent, role.
- Ensure that the role has all privileges with a suggested type of Super Admin and below assigned to it.
Note: There are a few privileges that do not fall into this category.
Note: Your exact number or privileges will depend on what applications you have installed.
This step will configure the TDS application to automatically add the first user provisioned through the new STS authentication mechanism to the Administrator role. This needs to be done to prevent being locked out of the application after making the initial switch to STS authentication.
- Go to App Manager > Administration > Security Settings.
- Find the New users’s default role setting and select the role that represents “Administrators” (from the previous section).
Tip: This will ensure that the first time you load the application after changing the authentication mechanism you will be registered as an administrator with full permissions.
- Find the Enable just-in-time user provisioning setting and check it.
- Click Save.
These steps will change the TDS authentication mechanism to STS security.
- Go to App Manager > Administration > Authentication.
- CheckSecurity Token Service, then enter in the following information:
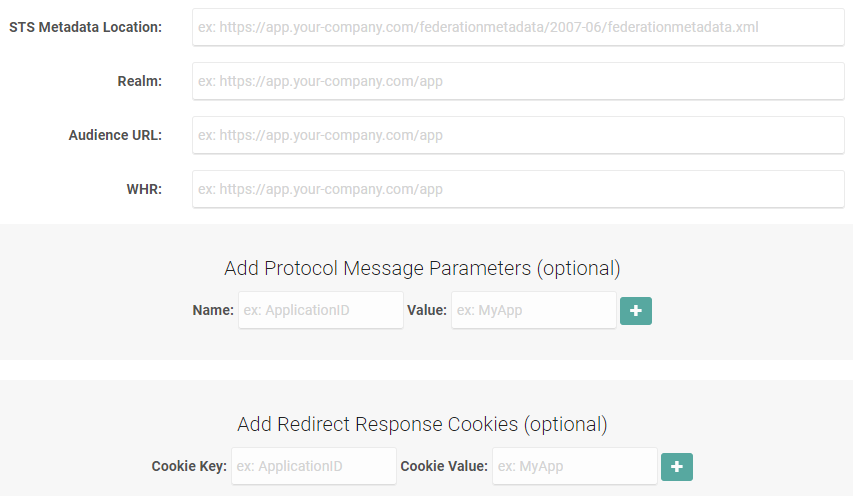
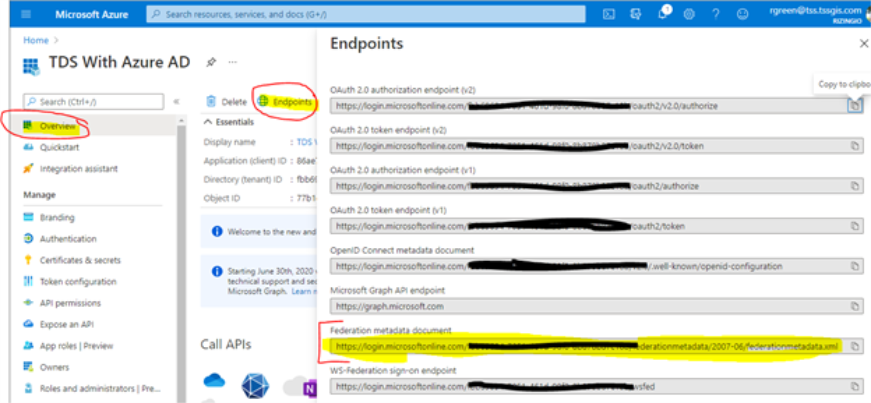
- STS Metadata Location - the Federation metadata document URL copied from Azure Portal in a previous step.
Example: For Azure AD: https://login.microsoftonline.com/YOUR_TENANT_ID/federationmetadata/2007-06/federationmetadata.xml
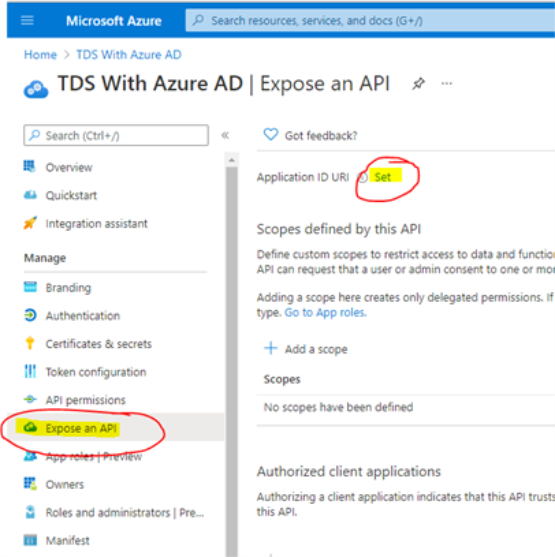
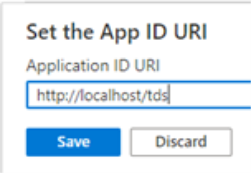
- Realm - the Application ID set in Azure Portal from a previous step
Example: https://demo.rizing.com
- STS Metadata Location - the Federation metadata document URL copied from Azure Portal in a previous step.
- Click Save and then click Change to confirm your changes.
Note: It may take a few moments for the application to save. Wait for it to complete.
- Load App Manager in a new browser window.
The application should redirect you to your IDP’s sign in and then redirect you back to App Manager with you signed in.Tip: You should see your name in the upper right corner.
Now that you can successfully access the application as an administrator, this step will walk you through changing the “New user’s default role” setting back to the desired role (usually a “General User” role).
- Go to App Manager > Administration > Security Settings.
- Find the New user’s default role setting and select the desired Role
from the dropdown.
Tip: This is the role that any new users who authenticate through your IDP will be automatically assigned to. It is typically set to a restricted user type of role, such as Standard Users.
Note: If you do not wish to have any new users automatically assigned to a role, then select Prevent automatic role assignment (for new users).
Your swap to STS authentication in TDS is completed. Test the application and make additional configurations for your specific needs.
Note: You can view users who have accessed the site and adjust their role assignment from the User Roles page.

